SIDE DUTCH BRAID W/ ZOTOS 180 PRO TEASELESS VOLUMIZING POWDER SHAKE

The Side Dutch Braid – 

Simple, classic, and one of my go-to hair styles. When you’re only wearing one braid, it’s an easy way to make it show from the front, looking straight on. 

This braid can be worn anywhere – work, class, brunch, a night out….BUT keep in mind that this hair is one of my favorite styles for the end of my wash cycle – meaning it does wonders for “hiding”/making greasy hair look fly. The 180 pro teaseless volumizing powder shake is essential for creating a lot of volume and hold in the hairstyle.

SUPPLIES YOU’LL NEED:

  1. ZOTOS 180 PRO TEASELESS VOLUMIZING POWDER SHAKE
  2. SMALL ELASTIC BAND
  3. BRUSH
  4. OPTIONAL: Curling Iron to wave your whispies

HOW TO GET THE BASIC DUTCH BRAID:

Here are some written instructions that you can use, if you need a little extra help while watching the tutorial. 

  1. Make sure your hair is brushed through and your Teaseless Volumizing Powder Spray is on hand. 
  2. Start with a deep part on one side – my part is on the right so the braid will be on my left shoulder.
  3. Spray the 180 Pro powder shake throughout the crown for targeted lift.
  4. Bring all your hair onto one side of your shoulder and split a small section of hair right by the front of your head into three, even strands.
  5. Take the outside right/back strand under the middle strand, then the left front strand under the middle.
  6. Add hair – from the back/top of your head – into the back strand and once again bring it under the middle strand. 
  7. Do the same thing with the front strand, adding hair from the front of the head, and taking the newly formed strand under the middle.
  8. Repeat steps 6 & 7 until you run out of hair and then continue the braid down to the bottom (right strand under middle, left strand under middle.) 

Here are some additional pictures of this hairstyle as well as the tutorial/video linked at the bottom!  ðŸ™‚


FullSizeRender-110 FullSizeRender-109FullSizeRender-107 FullSizeRender-108 FullSizeRender-106 FullSizeRender-105FullSizeRender-101 FullSizeRender-100  FullSizeRender-99 FullSizeRender-80FullSizeRender-82FullSizeRender-76 FullSizeRender-74 FullSizeRender-75 FullSizeRender-73FullSizeRender-72FullSizeRender-63 FullSizeRender-61 FullSizeRender-64 FullSizeRender-89 FullSizeRender-69 FullSizeRender-67FullSizeRender-62 FullSizeRender-65FullSizeRender-68   


 Youtube Hair Tutorial

xox,

GOLDILONGLOCKS 

Noella Van de Voorde


THE LUFFA FARM – THINGS TO EXPLORE IN SOCAL

IMG_3841

Hi Friends!

Anyone who knows me, knows that I love fun adventures! Lately life has been pretty hectic and it’s been difficult to allocate funds to travel/vacations. SO, I decided to make a list of different affordable, fun places to explore in the SoCal area! Of course, I’ll make vlogs and fill you in on the stops as I go, and this is the FIRST…THE LUFFA FARM! 

Deanne, the owner of the farm, is so passionate about her hobby, that has turned into a business because of all the attention the Loofahs have gotten! She is one of the only growers of Luffa sponges in the USA and she makes this free (YES FREE!) tour so fun and informative – who knew there was so much to learn about these plants! Plus, she does a full walk through of her herb garden, samples included, telling you the benefits and uses of everything. 

I don’t want to give away too much, but you can watch my vlog, linked below, to see a little more. For anyone who makes the drive from SoCal up to NorCal – this place is 100% worth a stop, to enjoy the scenery at the very least. All of the pictures below are untouched/unedited so you can see the real deal. All Youtube/Instagram GIVEAWAY info can be found at the bottom of this post.:

HIGHLY RECOMMENDED FOR: Anyone who loves DIY, spas, holistic care, self care, adventure, plants, herbs, gardens, behind the scenes, natural living.

IMG_3863IMG_3819IMG_3857IMG_3835IMG_3828IMG_3824IMG_3827IMG_3826IMG_3848IMG_3854IMG_3850IMG_3849IMG_3851IMG_3852IMG_3853IMG_3888IMG_3847IMG_3862IMG_3890IMG_3872IMG_3867IMG_3865


YOUTUBE/INSTAGRAM GIVEAWAY INFO (THIS GIVEAWAY IS NOT SPONSORED BY YOUTUBE OR INSTAGRAM. THIS GIVEAWAY IS SPONSORED BY THE LUFFA FARM AND GOLDILONGLOCKS):

TO ENTER- You can enter on youtube, Instagram, or both. See below.

YOUTUBE: You must leave a comment on my Luffa Farm Vlog, and subscribe to my channel! (You have to do both to be entered. 1 entry per user. )

INSTAGRAM: Like & Comment on the giveaway picture tagging one of your besties and follow @goldilonglocks if you’re not already! (unlimited entries per user.)

MAKE SURE THAT YOU ALSO LEAVE YOUR INSTAGRAM HANDLE IF YOU DON’T CHECK YOUTUBE MESSAGES – OR THE BEST WAY TO GET AHOLD OF YOU, IF YOU WIN! THANKS 🙂 

Also thank you again to Deanne, I admire your passion for loofahs and love for life!


xox,

Noella aka @goldilonglocks


HOLIDAY HAIR: CHRISTMAS WREATH HAIRSTYLE!

 fullsizerender-64

Merry Christmas/Happy Holidays/Happy Hanukkah! I hope this hair wreath makes you smile during whatever special time you and your loved ones are celebrating this season. 

WHERE TO WEAR THIS STYLE:

You can obviously wear this festive style whenever and wherever you’d like because I think it’s perfect for the holiday season. This style in particular looks really neat and elegant from the front and side, because you only see the fun wreath from the back! It can be worn to family or friend gatherings, holiday costume parties such as an Ugly Sweater Party, boat parades, meeting Santa, etc.!

WHAT YOU’LL NEED FOR THIS STYLE:

  1. THICKER RUBBER BAND (GLL product choice: SCUNCI
  2. BOBBY PINS (GLL product choice: SCUNCI no-slip grip bobby pins)
  3. HAIR BRUSH (GLL product choice, not pictured: TANGLE TEEZER)
  4. SPRAY BOTTLE (GLL product choice: GOSSIP GIRLS TEAL) Fill with water for temporary hold or hairspray for long lasting.
  5. CHRISTMAS WREATH DECORATIONS (GLL product choice: I bought this Ugly Sweater Kit at Big Lots for $6. They also sell these kits at Target, Nordstroms Rack, or MANY different places online. The fun part is to BE CREATIVE! You can use anything you already have in your craft drawer at home, such as puff balls, ribbon, bows, felt, beads, pipe cleaners etc.! I would love to see what you come up with, so make sure to use the hashtag #goldilonglocks)
  6. BUN FORMER (GLL product choice: I actually got my bun former from H&M in the mall for a couple bucks. If you are ordering online, amazon has a lot of great choices. Keep in mind, they sell different colors for light and dark hair….I use both.


d2bb41e2-76fc-48eb-bb8b-d842a8e7742b


Below is a STEP-BY-STEP guide, along with the link to watch my youtube tutorial!

1) Start with your hair in a mid height ponytail – right at the top of your ears. Use your brush to make it as smooth as you would like. 

fullsizerender-28

2) Place your donut bun former around the ponytail. Make sure it’s brushed through, tangle free.

fullsizerender-23

2) Use a spray bottle (with water, or hairspray for a better hold)  to wet and hold down all of the baby hairs. This will ensure a sleek, clean ponytail.

fullsizerender-27

2) Spread your hair out to cover the bun former like so. If you are doing this on yourself if works best to do it with your head looking down.

fullsizerender-24

2) Starting on the bottom right, split the hair in half and start swooping the right side up, tucking it under the bunformer. 

Keep swooping around and tucking under until you run out of hair.

fullsizerender-25

2) Keep swooping around and tucking under until you run out of hair.

fullsizerender-26

2) Use as many bobby pins as you need to secure the ends down. If you have thicker hair, bigger bobby pins work much better,

fullsizerender-29

2) At this point you can grab your decorations and have fun being creative with your wreath!fullsizerender-31

fullsizerender-32

2) Here’s the finished product! 

fullsizerender-65


To see more of this style, make sure to watch the tutorial on my Goldilonglocks Youtube channel!

xox,

GOLDILONGLOCKS 

Noella Van de Voorde


WATCH TUTORIAL 

MERMAID ROCKER HAIRSTYLE


ha

Happy Monday #lockslovers!

Here’s a little something to pick you up after this Monday-ish Monday! 😉 I call this one the Mermaid Rocker because you have long flowy mermaid hair on one side and an edgy rocker style on the other! Perfect for those days where your feeling pretty and girly but then quickly snap into action to rule the world…. you know, a typical Monday! Click here to see my youtube tutorial for this style now or wait until you scroll to the bottom because it’s linked there too! 

WHERE TO WEAR THIS STYLE:

I LOVE this hairstyle for any type of fun event! I think it’s gorgeous for dances like Homecoming or Winter Formal, because you get to have one side of your hair down and polished curls for pictures, but you also have a fun & edgy side as well (hence the “mermaid rocker”). This is also a go-to hairstyle for concerts of all types of music, but it works especially well for R&B & Hip Hop shows – think Riri or Beyonce!  In my opinion, this style has a total glammed up feel to it, so wear it whenever you need an extra boost!

SUPPLIES YOU’LL NEED:

  1. HAIRSPRAY – (GLL product choice: REDKEN QUICK DRY 18)
  2. THERMAL IRON PROTECTANT – (GLL product choice: BAIN DE TERRE THERMAL IRON PROTECTOR)
  3. TEASING COMB – (GLL product choice: CRICKET AMPED UP TEASING BRUSH)
  4. CURLING IRON/ROD – (GLL product choice:Nume Style 25mm wand)
  5. BOBBY PINS & AN ELASTIC RUBBER BAND – (GLL product choice: SCUNCI)

img_1892

HOW TO GET THE BASIC DUTCH BRAID:

Here are some written instructions that you can use, if you need a little extra help while watching the tutorial. 

  1. Grab a small section of hair from the front of your head.
  2. Split that small section of hair into three, even strands.
  3. Take the outside right strand under the middle strand.
  4. Take the outside left strand under the middle strand.
  5. Section off a new piece of hair (just like you did in the first step). Add the top half of that piece into the outside left strand, and the bottom half into the outside right strand.
  6. With your newly formed three strands, take the outside right one under the middle, and then the outside left strand under the middle. 
  7. Repeat steps 5 & 6 until you run out of hair and then continue the braid down to the bottom (right strand under middle, left strand under middle. 

Here are some additional pictures of this mermaid rocker hairstyle as well as the tutorial/video linked at the bottom! Hope you LOVE this look as much as I do – let me know what you think! 🙂

m2m3m4m5m6m7m9m10m11m12m14m15m18 m20


xox,

GOLDILONGLOCKS 

Noella Van de Voorde

WATCH TUTORIAL 

EVA NYC Surfs Up! Texture Spray + GLL Hairstyle


Hi Friends!

If you watch my hair tutorials, you’ve probably seen me using the Eva Surfs Up! Texture Spray a lot. It’s one of my go-to essentials for high volume hair in seconds. So, I figured it’s worth a bloggy post to let you in on something that actually works and doesn’t waste your money, thoughts?! (Also this is not sponsored in any way, just one of my golditricks that gives you that “instagram hair”. Stick around and scroll down to see a texture spray inspired GLL hairstyle!) 

PROS: My favorite part about the spray is how light it is – in fact, you can barely feel that you sprayed anything in at all! Unlike some sprays, there is no sticky residue and your hair doesn’t get hard to brush through or work with. It does give your hair a slight matte finish, but that in my opinion, makes it look big, beachy, and gives it great texture. It seriously makes my hair feel so much thicker just by spraying it in and using my fingers to style. Also, it smells heavenly, which we all know is very important and keeps me coming back to purchase more! Which, speaking of that, it’s only $11.99 a bottle at Ulta – which is my favorite part!! I happen to love texture and sea salt sprays and this is half the price of most of the expensive ones that work really well. Half the price, same results?! I’ll take it. 

CONS: There is obviously a time and a place for big, beachy hair. This texture spray can sometimes help contribute to the messy look so make sure that if you want texture along with neatness, you should use a brush or style accordingly. 


unnamed-19

PHOTO: This is the before and after of using the texture spray and using my fingers to scrunch up my hair a little. You can see how it just instantly gives it that beachy texture and volume! 

SURFS UP! TEXTURE SPRAY INSPIRED GLL HAIRSTYLE:

fullsizerender_4

Here are the steps needed to get this boho reverse fishtail headband – a perfect hairstyle to do with your texture spray! These are the supplies you’ll need to get started: some bobby pins, elastics, texture spray, and a curling iron/heat protectant if you want to add some waves. Today I’m using my 25 mm NuMe Wand, Bain De Terre Magnolia Thermal Iron Protector, and obviously the Eva NYC Surfs Up! Texture Spray. Also, I am wearing a few of myLuxy Hairextension wefts. These are the BEST because they are so easy and convenient to clip in and look so beyond real. Use code “GOLDI” for $5 off your own pair. 

fullsizerender_21

STEP 1 – Go through and add some curls if desired. I grabbed larger pieces of hair and I didn’t curl all of the hair – just enough to get rid of the top layer of bed head I was working with. Another way to get these waves without an iron, is to sleep with your hair in french braids the night before. Make sure your hair is a little damp before braiding so the waves hold. Regardless of how you get it, this look is really pretty if you have some wavy volume in your hair.

fullsizerender_19

STEP 2 – Grab a section of hair from the bottom part behind your ear.

fullsizerender_17

STEP 3 – Separate that strand into two pieces for a reverse fishtail braid. If you don’t know what a reverse fishtail is, you will take a piece from the outside of the right strand, bring it behind the right strand and combine it with the left strand. Same thing on the other side – grab a piece from the outside of the left strand, bring it behind the left strand and combine it with the right strand. Keep going like this, all the way down. The trick for this look, is that I made sure to grab nice size pieces from the outside each time. Normally when doing a fishtail I would grab smaller pieces for a more intricate look, but the chunkier will make the braid a little bigger and more importantly it’s quicker to do! 😉

fullsizerender_18

fullsizerender_16

STEP 4 – Pancake the fishtail, pulling the strands out on both sides. This will give the braid a bigger boho feel.

fullsizerender_15

STEP 5 – Pull out some pieces of hair in the front, they can be longer ones if you don’t have shorter bangs cut already.

fullsizerender_12

STEP 6 – Pull the braid up and over your head. Make sure to keep the pieces of hair out in the front.

fullsizerender_14

STEP 7 – Use your bobby pins to secure the braid down on the side of your head by lifting some of the back hair and pinning it right under. This will hide the braid and create the elusion that the braid disappears into your hair. Then use another bobby pin to secure the braid on top of your head for extra hold. 

fullsizerender_3

fullsizerender_2

STEP 8 – Finally, grab your texture spray – shake & spray! Then, I always use my fingers to carefully pick apart the hair and scrunch it up, volumizing my waves. 

 fullsizerender_6

Here’s the final look:

fullsizerender fullsizerender_11 fullsizerender_8 fullsizerender_7 fullsizerender_1 

Lastly – if you’re anything like me and like to be able to switch your hair halfway through the day – just know, this can be quickly transformed into a beautiful, out of your face, boho ponytail! 


Hope you enjoyed this post, let me know what you think! Make sure to tag any re-creations with #goldilonglocks, I’d loooove to see them!! 


xox,

GOLDILONGLOCKS 

Noella Van de Voorde

WHAT I’VE LEARNED FROM MOVING 9 TIMES IN 7 YEARS.

Hi Friends!

Yes, it’s true. I am now aware I’ve moved NINE TIMES since leaving for college. You may be thinking – How does that even happen? How can you move more times than years? Welp, thanks to apartment condition, timing, roommates, location, landlords, leases, jobs – I’ve been able to make it work. Would I recommend it? Nope. 🙂 But that’s life – you roll with the punches (before the punches roll you)! So I did. And I have to say it’s been pretty fun getting to decorate and DIY all of these apartments. Sometimes an energy switch-up is just what you need and moving gives you a chance to Feng Shui your life. Or at least that’s what I tell myself as I type, blankly staring at the moving boxes stacked in my closet. 

Below are the top FIVE lessons/tips I’ve learned from the last 9 moves, with some fun, detailed, learning examples. 😉 

1. VISIT YOUR NEW PLACE MULTIPLE TIMES BEFORE YOU SIGN THE LEASE.

Signing a lease is a big deal because often times you are stuck there for 1+ years. One of the worst things that can happen is to realize a detail that you can’t live with AFTER you sign the lease and are locked in. It’s important to see the place at different times of the day because there are different variables in play such as two of my biggest, light and sound. Is the person living above you a part time tap dancer by day, and choir member by night? Does the family below you have a newborn baby, with thin walls? While these are all livable life situations, it’s important that you are happy in your living space and aware of as many of these annoyances as possible before moving in. There will always be things you don’t notice and have to get used to, but at least you’ll have a heads up and be more aware. I will say this is a variable that is often difficult to control, especially since landlords (in LA at least) are so busy and don’t want to waste their time. There are ways to get around this, like asking to look at the size of the closets “one more time”, or even asking to take some measurements to make sure your furniture will fit. This is a good example of where second-guessing the situation can be very helpful. 

2. HIRE MOVERS FOR THE BIG STUFF.

At least hire movers to lift the crazy heavy furniture, if you have any. Don’t ever try to lift anything that is too heavy for you – especially not an armoire twice your weight. 😉 Two years ago I was moving into my Westwood apartment with Nut and one of my best friends, Julia. We actually did hire movers for everything, but they said they couldn’t get my armoire into the bedroom with how heavy it was and the shape of the wall. We all insisted it could be done, but they said we better not. After they left, we found a way to remove a couple more of the drawers, making it a little lighter. All three of us used all of our might, and succeeded in doing so – I also succeeded in tearing/pulling my intercostal muscle, which is basically located by your rib – or right under my left boob. WORST PAIN/INJURY OF MY LIFE –  lesson learned, don’t think you are stronger than you are physically, save that for the mentality. 😉 Seriously though – you can find movers for $100 bucks an hour after tip if you book it ahead of time. If you don’t have crazy heavy furniture, just ask a friend to help in advance. And then make sure to buy them some beer, or lemonade, or give them a big hug and pray they love you enough! JUST DON’T PULL YOUR MUSCLES – some don’t recover fully and it’s just not worth saving the money. 

3. ORGANIZE LIKE THE MOVERS ARE COMING THE DAY BEFORE. 

It’s no secret, moving is the way to really find out how much freaking stuff you have! Things that you’ve forgotten about for the last year – maybe it got jammed in between the couch and the wall, maybe it fell behind the bed, or maybe you had everything so tightly stored in a closet just so it would fit! Regardless, you’re going to find a couple of surprises. If you’re anything like me, you mayyyy underestimate the amount of things you have to pack. Normally, we would have everything boxed up (or in the final processes of boxing up) and would be packing our car at the same time that the movers were packing our furniture in theirs. This made things slightly chaotic! Instead, on this last move, we had a “moving day” the day before the movers actually came. We took all of our clothes, accessories, towels – basically anything that we could carry, over to the new place. Not only did this enable us to be more calm and present on the actual “moving day”, it actually ended up saving us a good amount of money too since the move was a lot quicker.

4. START YOUR NEW LEASE A WEEK BEFORE THE OLD ONE ENDS, IF POSSIBLE. 

Alright, let’s face it, this piece of advice is only is you can afford to do so. But if you can, I’m going to tell you it makes ALL the difference. We started this new lease two weeks before our old one was up. We did so for many reasons, but mainly because Nut already had a trip planned right smack in the middle of all this, and also because we decided we would rather move all of our stuff (minus the furniture) over ourselves, at our own pace, than pay the movers to help us with the boxes. Best moving decision we made because nothing felt rushed! To be 100% honest, I didn’t think it would be worth the financial means but I was definitely proven wrong.

5. ALWAYS MAKE SURE EVERY SINGLE IMPORTANT DETAIL IS COVERED IN THE LEASE.

I need to re-read this one myself a few times because I have to admit that we pretty much failed at this in our last apartment. It’s a tricky situation in cities that are desirable (i.e. Santa Monica), because you have to be so quick in every decision to ensure you can even get the unit. For example, my roommate was the first person to reach out to our SM landlord, we were the first ones to get over there and see the place, and we signed the papers right then and there. We had to, as there were countless other groups desperate to lock down the lease agreement. We did what we had to do to get the apartment, but during the rush, we missed a couple important details. The landlord had toured us around the property showing us our 3 parking spots that came with the place – the lease ended up only having 2 spots included. We spent the rest of the year at the top of our price range, battling for parking everyday.  He also told us he was looking for long term tenants and would not raise our lease for a minimum of 2 years. Here we are, a year later, having to do this move all over again because our rent was raised a crazy amount. Don’t let anyone rush you. I know it’s easier said than done, but take your time!


I imagine that some of this advice really resonates with my big city friends, since that’s where apartments seem more difficult to come by. Trust me, I have many friends in New York, and San Francisco…..enough said. Hopefully you enjoyed this post and let me know anything that you think is super important. In the meantime, enjoy my GOLDIVLOGS of Nutty and I nailing this move….seriously smoothest one yet! Shoutout to Nutty for being such a trooper on his first vlog – being in front of the camera isn’t necessarily his thing, but he let’s me film whatever I want because he knows it makes me happy! 🙂


xox,

GOLDILONGLOCKS 

Noella Van de Voorde

The Dutch Braided Bun Updo – GLL HAIR FAVE

Happy weekend friends!

What’s better on your Saturday night in, than taking care of yourself & having a little R+R – maybe a nice face mask, a bubble bath, and a hair tutorial to get you excited for something fun coming up next week! 😉 Orrr if your coming home from a late night out – this could give you some inspiration while you heat up your leftovers or anything else you can find in the fridge. Whatever your scenario, this tutorial is here for all of you and I’m so excited about this one in particular because it’s one of my favorite hairstyles – The Dutch Braided Bun Updo! 

The Dutch braid is a three strand braid, where you take turns bringing the outside strands under the middle one, adding pieces of hair to both sides as you braid down. It’s very similar to the French braid, but it offers more of a 3-D effect, making it great for big braids. For this particular hairstyle you are creating a braid on one side, all the way down, and then wrapping it around itself to form a bun in the back. After looking through the pictures below, don’t forget to watch the tutorial!

OUTFIT DEETS:

SKIRT – Top Shop – $55 

TOP – Sun & Shadow / Nordstroms – “SOLD OUT” at Nordstroms & N. Rack

LIPSTICK – Maybelline Color Sensational Creamy Matte Lip Color – Electric Pink – $7.99


SUPPLIES YOU’LL NEED:

  1. HAIRSPRAY – (GLL product choice: REDKEN Quick Dry 18 )
  2. THERMAL IRON PROTECTANT – (GLL product choice: BAIN DE TERRE THERMAL IRON PROTECTOR)
  3. HAIR BRUSH – (GLL product choice: TANGLE TEEZER)
  4. CURLING IRON/ROD – only if you are planning on curling your whispies/baby hairs/bangs for a messier looser look. (GLL product choice: HOT TOOLS 3/4″ iron OR Nume Style 25mm wand)
  5. BOBBY PINS, ELASTIC RUBBER BANDS, & A THICKER RUBBER BAND – (GLL product choice: SCUNCI
 

WHERE TO WEAR THIS HAIRSTYLE:

This is one hairstyle that can honestly be worn to SO many different events, which is why it’s one of my absolute favorites! I wear this as an everyday look – running errands, going to work, really anywhere you can think – and that’s because once you get good at it it’s such minimal effort for how amazing it looks. Call me lazy, or call me efficient! 😉 

Since this hairstyle pulls all of your hair onto one side, it’s possible to get that bigger chunky looking braid – perfect for weddings, photoshoots, date nights, or any occasion where you want to look special. It’s also a great alternative to a regular bun for anyone that has to wear their hair up for work or school. There are many places I have volunteered where your hair is required to be up/back, and this allows for adhering to the rules with some extra style.


Below are more pictures of this look along with a link to the tutorial, so you can learn how to do it yourself:  


1a1c1f1d1g1h1j1n1l1o1i1k1m

xox,

GOLDILONGLOCKS 

Noella Van de Voorde

WATCH TUTORIAL 


4 Waterfall Twist Variations


Happy hump day #lockslovers!

Here’s my latest hairstyle that I’m sharing with you guys, 4 waterfall twist variations! They are all done through the same basic waterfall twist half-up, but it includes a ponytail, updo, and a more accessorized back-to-school version.  Click here to see my youtube tutorial now, if you cant wait until you scroll to the bottom – it’s linked there too! 😉 The waterfall twist is a simpler version of the waterfall braid. It’s quick, easy, and the best part is that it’s perfect for all different types of hair – long or short. 

WHERE TO WEAR THIS STYLE:

As always, you can wear this style anywhere that you heart desires, but here are some of my ideas. I love suggesting this style to girls who aren’t usually into the big intense braids, because it’s a very simple twisted look that comes off subtle yet polished. I think this style is PERFECT for back to school in general. The ponytail and updo are a little more boho so honestly I think you can dress these styles up a little more and wear them while attending a wedding or something of that sort. Otherwise, the down versions are great for everyday and keep the front bangs out of your face. Perfect for a date night, football game, or concert.

SUPPLIES YOU’LL NEED:

  1. HAIRSPRAY – depending on how well your hair holds or how well it falls out 😉 you may want some hairspray! (GLL product choice: BAMBOO UPLIFTING HAIRSPRAY)
  2. THERMAL IRON PROTECTANT – always use a protectant when curling or straightening with heat products (GLL product choice: BAIN DE TERRE THERMAL IRON PROTECTOR)
  3. HAIR BRUSH – make sure your hair is thoroughly brushed out before you start (GLL product choice: TANGLE TEEZER)
  4. CURLING IRON/ROD – remember, this style can be done without curls as well, especially if you don’t have access to an iron. (GLL product choice: HOT TOOLS 3/4″ iron OR Nume Style 25mm wand)
  5. BOBBY PINS, ELASTIC RUBBER BANDS, & A THICKER RUBBER BAND – for these simple accessories any brand works. (GLL product choice: SCUNCI)

HOW TO GET THE BASIC WATERFALL TWIST:

Here are some written instructions that you can use, if you need a little extra help while watching the tutorial. 

  1. Start with your hair in a middle part.
  2. Grab a small section of hair by the very front/top of your part. Split that section into two pieces and hold them with your left hand. 
  3. Next, grab another small section of hair, (the same size as each of the other two), right behind where you grabbed the other section from. Drop this third strand right in between the other two strands and leave it there. 
  4. Working with your original two strands, bring the front over the back, so that front piece that you just crossed over will become your new back piece. 
  5. Continue steps 3 & 4 until you work all the way to the back middle and have used all the hair on the upper side of the part. 
  6. When done, secure the twist into place with a bobby pin and continue the same steps on the other side, twisting until both waterfall twists reach the back middle and you can pin them together. 


Here are some additional pictures of all four variations as well as the tutorial linked at the bottom! Hope you enjoy this look, let me know what you think! 🙂


25b26b20b24b16b18b14b12b13b11b10b9b1b2b3b


xox,

GOLDILONGLOCKS 

Noella Van de Voorde

WATCH TUTORIAL 


DUTCH LACE CROWN VARIATIONS – flower bun & braid


Hi #lockslovers!

Another tutorial is up on my youtube channel! This tutorial is how to do the Dutch Lace Crown braid & the Dutch Lace Crown Flower Bun. Doing the dutch braid may seem overwhelming, but it’s actually quite simple once you get the hang of it. Practice in the mirror over and over again and I PROMISE YOU, one time, the braid is going to come out perfect and you’ll be like”……..wait a second? Did I really just do that?!” It’s all about the muscle memory!!

Here are a few important tips/elements of the braid. First, since it’s a lace braid, that basically means we are only going to be adding hair into one side of the braid instead of both sides. Second, Since it’s a Dutch braid, that means that you will be crossing the outside strands under the middle strand, instead of over the middle strand (like in a french braid). Lastly, make sure to pull the braid tight and up high on your head as you braid and add hair in. Also make sure you are braiding towards the back of the room. This will ensure that your braid wraps around your head to combine with the other braid, without having any bumps. 


There are only two things you absolutely need for this style:

  1. ELASTIC RUBBER BANDS (GLL product choice: SCUNCI clear elastics
  2. BOBBY PINS (GLL product choice: SCUNCI no-slip grip bobby pins

Here are a few products you will want to enhance this look: 

  1. HAIRSPRAY (GLL product choice: BAMBOO UPLIFTING HAIRSPRAY)
  2. TEXTURIZING SPRAY OR TAFFY (GLL product choice: EVA NYC SURF’S UP TEXTURE SPRAYor KENRA TEXTURIZING TAFFY)
  3. THERMAL IRON PROTECTANT (GLL product choice: BAIN DE TERRE THERMAL IRON PROTECTOR)
  4. HAIR BRUSH (GLL product choice: TANGLE TEEZER)
  5. CURLING IRON/ROD (GLL product choice: HOT TOOLS 3/4″ iron OR Nume Style 25mm wand)

WHERE TO WEAR THIS BRAID:

This braid is perfect for anywhere that you want to feel special. This reminds me of a princess braid and every time I wear it it makes me feels so styled and ready for the day. I think it’s perfect look for back to school style – go back turning heads and feeling confident! It also keeps the hair out of your face while still down and pretty. Other ideas are for birthday parties, weddings, or out to brunch.

Below are some additional pictures of both hairstyles, along with the link to watch my youtube tutorial!

t17

t14

t13

t11

t15

t2

t6

t8

t7

t1


xox,

GOLDILONGLOCKS 

Noella Van de Voorde

WATCH TUTORIAL 

7 SIMPLE HAIRSTYLES DONE IN MINUTES FOR AN EASY WEEK!

Day One (2)


Hi Friends! This bloggy post is inspired by one of my followers on instagram, Emma,  who is going back to school and needed ideas for everyday hairstyles. She specifically requested up, down, out of her face, and not anything tooo braid centered. Basically she needed some hairstyles she could do quickly before school, while still looking like the put together, beautiful, and confident girl that she is!

Here are 7 hairstyles that can be done by anyone using your curly, natural or straight hair – however you want to wear it! Everything is designed to be able to style in under five minutes and head out the door – if you are going to add curls or some straightening, keep in mind that may tack on some time to the styling. In this post I’ll walk you through step-by-step how to do each completed look, hope you enjoy!

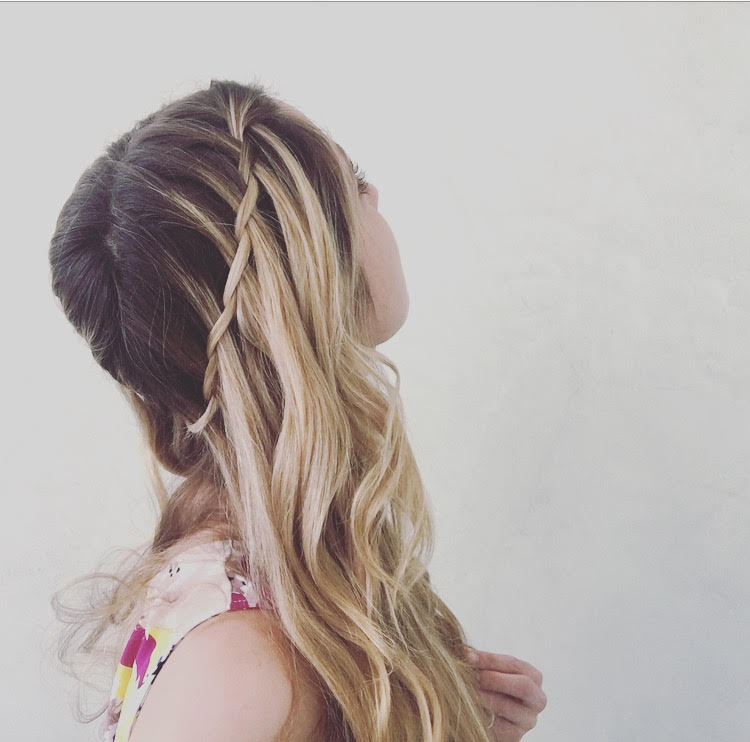
Luxy Hair: 18″ – 20″ dirty blonde Luxy hair was used. For $5 off your pair of luxies use code “GOLDI”. 


DAY ONE: THE PONY WRAP BUN


Untitled design (9)

STEP 1 – First, gather your hair to the back of your head and grab a rubber band.

STEP 2 – Next, wrap the rubber band around the hair once. On the second time, only pull the pony half of the way through the band, forming a bun and leaving your ends hanging out. 

STEP 3 & 4  – Use your ends to wrap around the bun, hiding the rubber band. 

STEP 5 & 6 – When you run out of hair, secure the ends with a bobby pin. You can then use you hands to adjust the bun to your liking. Remember you can always use bobby pins to tuck away any stray hairs or to shape the bun.

MORE OF THE COMPLETED LOOK:

unnamed (31)unnamed (30)unnamed (32)


DAY TWO: ACCENT BRAID WRAPPED PONYTAIL

Untitled design (11)

STEP 1 – Start by gathering your hair into a ponytail at the back of your head.

STEP 2 – Secondly, secure it with a rubber band and for some added volume, push up on the roots.

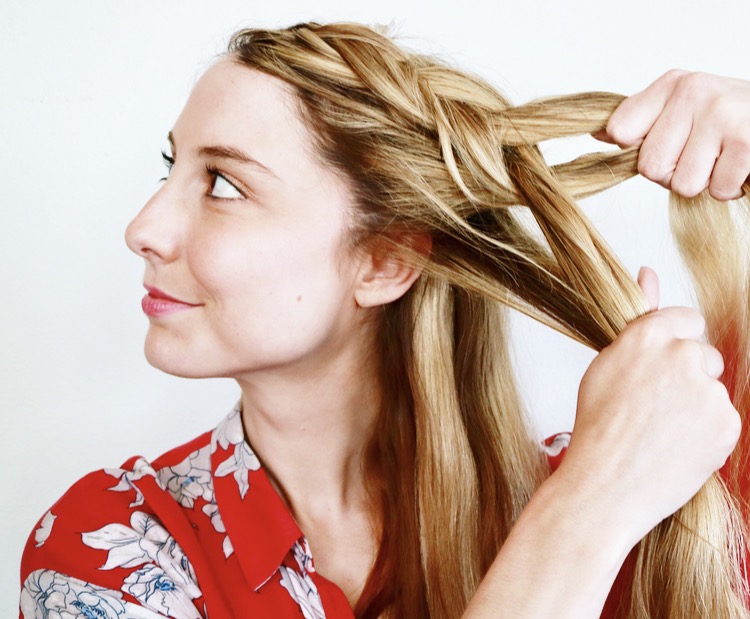
STEP 3 – Grab a small section of hair from the bottom of the pony, and decide what style you want your accent to be. You can do any sort of braid OR you can just use the hair without any styling. I went with a regular braid because it’s quick but still looks fancy. ( three strands of hair, right strand under middle strand, then left strand under middle strand repeating this all the way down.)

STEP 4 – Wrap you braid all the way around the rubber band, to hide it, and when your done wrapping secure the end with a bobby pin. 

STEP 5 & 6 – This is the completed look from both sides. Keep in mind you can make you pony as high or low as you want on your head.

MORE OF THE COMPLETED LOOK:

unnamed (45) unnamed (46) unnamed (49)

DAY THREE: SIMPLE TWISTED CROWN

Untitled design (12)

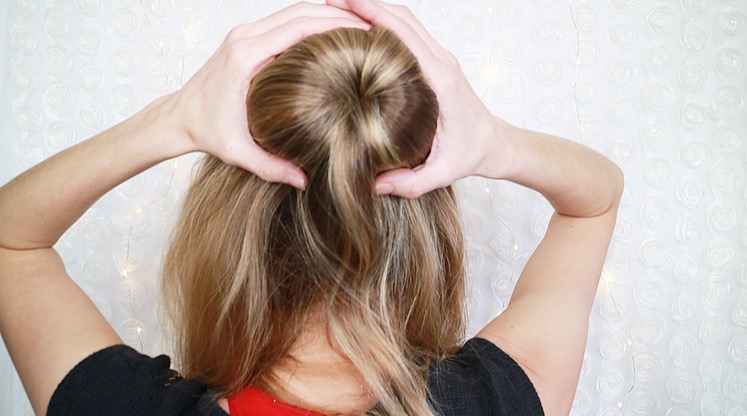
STEPS 1 & 2 – You can start with a middle part or with your hair slightly parted to one side. Grab a section of hair from the front of your head on each side and twist it to the back, as seen in the photos. 

STEP 3 – With your left hand, hold the twists together, and use your right hand to comb down the hair in the back.

STEP 4 – Next, combine your twists together at the back and secure them with a rubber band. Note how you can see the rubber band at this step.

STEP 5 – Grab the tail of your twists, bringing it up and flipping it through the crown and pulling it down. 

STEP 6 – At this point you can use your hand to pull out the twists if you want them bigger with more volume. I kept mine tight and neat!

MORE OF THE COMPLETED LOOK:

unnamed (86) unnamed (88) unnamed (90)

DAY FOUR: INSIDE OUT PONYTAIL 

Untitled design (14)

STEP 1 – Gather your hair into a ponytail and secure it with a rubber band.

STEP 2 – Using your fingers, make a hole for your hair, big enough for your ponytail to fit through. Lift your ponytail up, grabbing it by the ends, and put it through the hole you just created. 

STEP 3 & 4 – Lastly, pull on the ends to make sure they came through all the way and that no hair is stuck/tangled. 

MORE OF THE COMPLETED LOOK:

unnamed (40) unnamed (41) unnamed (42)

DAY FIVE: BRAIDED HEADBAND

Untitled design (15)

STEP 1- First, grab a section of hair from behind the bottom of your ear, it doesn’t matter which side of your head. 

STEP 2 – Create a braid with that section and then using your hands, pancake, or pull the braid out to make it a little thicker looking.

STEP 3 – Pull out any of the whispies or bangs that you want out in the front, or you can keep all of your hair pushed back and out of your face. Use your hand to pull the braid over your head and secure it behind the opposite ear with a bobby pin. 

STEPS 4, 5 , & 6 – You can keep your hair down, or you can choose one of the other variations to keep your hair tied back. My favorite thing about this hairstyle is that you can start with it down in the beginning of the day and throw it in a bun in the second half of the day (as it gets busier, more hectic, or more hott outside lol). 

MORE OF THIS COMPLETED LOOK: 

 unnamed (55) unnamed (60) unnamed (63)

DAY SIX: SLEEK DOUBLE WRAP-AROUND PONYTAIL

Untitled design (16)

STEP 1 – Create two sections of hair by the front of the head and keep them seperate. Combine all other hair into a ponytail and secure it with a rubberband. 

STEP 2 – Next, let go of the right section. Bring the left section back, wrapping it around the ponytail, and securing the end with a bobby pin. 

STEP 3 & 4 – Repeat the same thing with the right section of hair, wrapping it over the left strand, and eventually using a bobby pin to secure it into place. 

MORE OF THE COMPLETED LOOK:

unnamed (24)unnamed (21) unnamed (22)  unnamed (25)

DAY SEVEN: HALF-UP FLOWER BUN

Untitled design (17)

STEP 1 – Grab two sections from the front of your hair and combine them in the back. You can use a brush to smooth out the top and get rid of any bumps.

STEP 2 – Secure the hair with a small elastic rubber band. 

STEP 3 – Braid the pony and using your left hand, bring it up, twisting it around the base of the rubber band. 

STEP 4 – When you run out of hair you can sure it with a bobby pin. Then use you hands to open up the braided bun until it resembles a flower, or until you are happy with it, because that’s all that matters!

MORE OF THE COMPLETED LOOK: 

unnamed (75) unnamed (76) unnamed (79)

xox Noella