
Happy hump day #lockslovers!
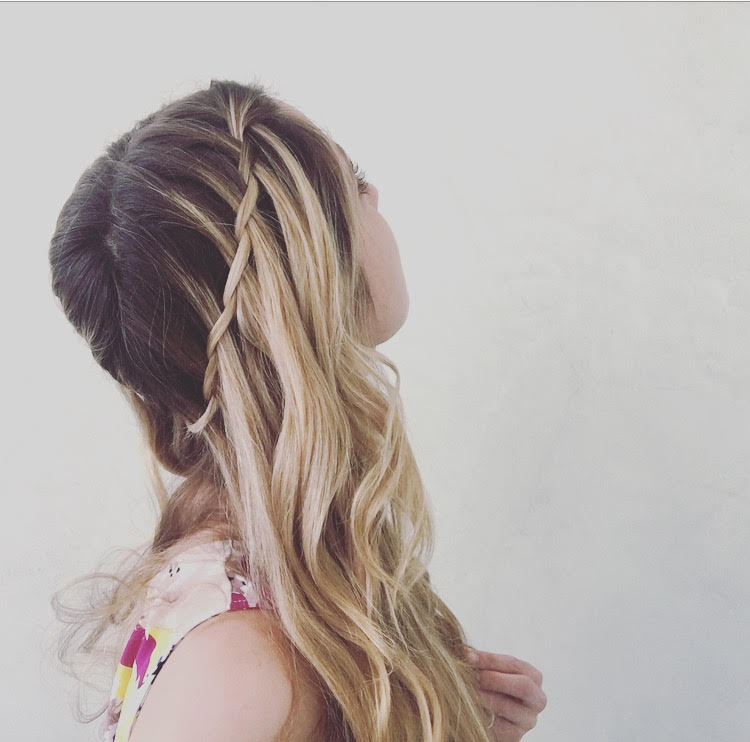
Here’s my latest hairstyle that I’m sharing with you guys, 4 waterfall twist variations! They are all done through the same basic waterfall twist half-up, but it includes a ponytail, updo, and a more accessorized back-to-school version. Click here to see my youtube tutorial now, if you cant wait until you scroll to the bottom – it’s linked there too! 😉 The waterfall twist is a simpler version of the waterfall braid. It’s quick, easy, and the best part is that it’s perfect for all different types of hair – long or short.
WHERE TO WEAR THIS STYLE:
As always, you can wear this style anywhere that you heart desires, but here are some of my ideas. I love suggesting this style to girls who aren’t usually into the big intense braids, because it’s a very simple twisted look that comes off subtle yet polished. I think this style is PERFECT for back to school in general. The ponytail and updo are a little more boho so honestly I think you can dress these styles up a little more and wear them while attending a wedding or something of that sort. Otherwise, the down versions are great for everyday and keep the front bangs out of your face. Perfect for a date night, football game, or concert.
SUPPLIES YOU’LL NEED:
- HAIRSPRAY – depending on how well your hair holds or how well it falls out 😉 you may want some hairspray! (GLL product choice: BAMBOO UPLIFTING HAIRSPRAY)
- THERMAL IRON PROTECTANT – always use a protectant when curling or straightening with heat products (GLL product choice: BAIN DE TERRE THERMAL IRON PROTECTOR)
- HAIR BRUSH – make sure your hair is thoroughly brushed out before you start (GLL product choice: TANGLE TEEZER)
- CURLING IRON/ROD – remember, this style can be done without curls as well, especially if you don’t have access to an iron. (GLL product choice: HOT TOOLS 3/4″ iron OR Nume Style 25mm wand)
- BOBBY PINS, ELASTIC RUBBER BANDS, & A THICKER RUBBER BAND – for these simple accessories any brand works. (GLL product choice: SCUNCI)
HOW TO GET THE BASIC WATERFALL TWIST:
Here are some written instructions that you can use, if you need a little extra help while watching the tutorial.
- Start with your hair in a middle part.
- Grab a small section of hair by the very front/top of your part. Split that section into two pieces and hold them with your left hand.
- Next, grab another small section of hair, (the same size as each of the other two), right behind where you grabbed the other section from. Drop this third strand right in between the other two strands and leave it there.
- Working with your original two strands, bring the front over the back, so that front piece that you just crossed over will become your new back piece.
- Continue steps 3 & 4 until you work all the way to the back middle and have used all the hair on the upper side of the part.
- When done, secure the twist into place with a bobby pin and continue the same steps on the other side, twisting until both waterfall twists reach the back middle and you can pin them together.
Here are some additional pictures of all four variations as well as the tutorial linked at the bottom! Hope you enjoy this look, let me know what you think! 🙂


xox,
GOLDILONGLOCKS
Noella Van de Voorde

WATCH TUTORIAL

Leave a Reply